Super App using Re.Pack

Hello World,
If you landed on this article you probably are building or curious about how a Super App can work.
When we talk about a Super App, from a product perspective, we are talking about an application that offers a wide range of services on a single platform, with the goal of providing a convenient and complete solution for users. Know why your business may need a Super App here.
From a technical point of view we have some challenges in building this technology:
- Navigation between modules;
- Permissions between modules (miniapps);
- App size;
- Code separation for different teams;
- Continuous deploys per teams;
An interesting book that talks more about these challenges is Building Mobile Apps at Scale
Some of these challenges can be tackled with Re.Pack, a toolkit made specifically for React Native apps that uses Webpack under the hood. It serves as an alternative to Metro, allowing features like Code Splitting to be possible within the React Native ecosystem.
Re.Pack was created by CallStack, a technology consultancy focused on the React Native ecosystem. They launched a super app building training and in this article I share my learnings from it.
Super App Example
Let's start with an example repository with two apps inside a monorepo, that is, HostApp and MiniApp.
-
HostApp is a simple app with HomeScreen and DetailScreen, which you can access through a button on HomeScreen.
-
MiniApp is similar, but has a button that navigates to the GalleryScreen with a list of photos.
git clone --branch initial https://github.com/kibolho/super-app-example.git
In both packages/host-app and packages/mini-app install Re.Pack with its dependencies:
yarn add -D webpack terser-webpack-plugin babel-loader @callstack/repack
Now instead of running the following command to start Metro Bundler:
react-native start
Let's run to start WebPack Bundler:
"start": "react-native webpack-start",
Linking MiniApp to HostApp
On MiniApp's webpack.config.mjs file, let's add Re.Pack's Module Federation plugin:
To identify if MiniApp is running standalone, we add this constant at the top of the file:
const STANDALONE = Boolean(process.env.STANDALONE);
Inside the plugins array:
new Repack.plugins.ModuleFederationPlugin({
  name: 'MiniApp',
  exposes: {
    './MiniAppNavigator': './src/navigation/MainNavigator',
  },
  shared: {
    react: {
      singleton: true,
      eager: STANDALONE,
      requiredVersion: '18.2.0',
    },
    'react-native': {
      singleton: true,
      eager: STANDALONE,
      requiredVersion: '0.72.3',
    },
    '@react-navigation/native': {
      singleton: true,
      eager: STANDALONE,
      requiredVersion: '6.1.6',
    },
    '@react-navigation/native-stack': {
      singleton: true,
      eager: STANDALONE,
      requiredVersion: '6.9.12',
    },
    'react-native-safe-area-context': {
      singleton: true,
      eager: STANDALONE,
      requiredVersion: '4.5.0',
    },
    'react-native-screens': {
      singleton: true,
      eager: STANDALONE,
      requiredVersion: '3.20.0',
    },
  },
})
- Exposes: Indicates which modules will be exposed and the names of those modules.
- Shared: indicates which packages will be shared;
- Singleton: indicates which ones will be instantiated only once;
- Eager: indicates those that will be initialized by the module, in the case the miniapp will only be initialized if running individually.
We also update the scripts to start the development server on a different port from the default (8081), since the default will be used by HostApp.
"start": "react-native webpack-start --port 9000",
"start:standalone": "STANDALONE=1 react-native webpack-start",
The navigator exposed by the miniapp will only show a back button if it is not running standalone:
import {
  NativeStackNavigationProp,
  createNativeStackNavigator,
} from '@react-navigation/native-stack';
import React from 'react';
import {ImageRequireSource, StyleSheet} from 'react-native';

import {
  HeaderBackButton,
  HeaderBackButtonProps,
} from '@react-navigation/elements';
import GalleryDetailScreen from '../screens/GalleryDetailScreen';
import GalleryScreen from '../screens/GalleryScreen';
import HomeScreen from '../screens/HomeScreen';

const STANDALONE = Boolean(process.env.STANDALONE);

export type MainStackParamList = {
  Home: undefined;
  Gallery: undefined;
  GalleryDetail: {
    imageSource?: ImageRequireSource;
  };
};

export type MainStackNavigationProp =
  NativeStackNavigationProp<MainStackParamList>;

const Main = createNativeStackNavigator<MainStackParamList>();

const BackButton: React.FC<HeaderBackButtonProps & {navigation: any}> = ({
  navigation,
  ...props
}) => (
  <HeaderBackButton
    {...props}
    onPress={() => navigation.goBack()}
    labelVisible={false}
  />
);

const MainNavigator = () => {
  const NavOptions = {
    headerTitle: 'MiniApp',
    headerBackTitleVisible: false,
    headerStyle: styles.header,
    headerTitleStyle: styles.headerTitle,
    headerTintColor: 'rgba(255,255,255,1)',
  };
  return (
    <Main.Navigator screenOptions={NavOptions}>
      <Main.Screen
        name="Home"
        component={HomeScreen}
        options={
          STANDALONE
            ? undefined
            : ({navigation}) => ({
                ...NavOptions,
                headerLeft: props => BackButton({navigation, ...props}),
              })
        }
      />
      <Main.Screen name="Gallery" component={GalleryScreen} />
      <Main.Screen name="GalleryDetail" component={GalleryDetailScreen} />
    </Main.Navigator>
  );
};

const styles = StyleSheet.create({
  header: {
    backgroundColor: 'rgba(79, 55, 139, 1)',
  },
  headerTitle: {
    color: 'rgba(255,255,255,1)',
  },
});

export default MainNavigator;
HostApp
Now let's prepare the HostApp, in the webpack.config.mjs file add the module federation plugin to the plugins array:
 new Repack.plugins.ModuleFederationPlugin({
        name: 'HostApp',
        shared: {
          react: {
            singleton: true,
            eager: true,
            requiredVersion: '18.2.0',
          },
          'react-native': {
            singleton: true,
            eager: true,
            requiredVersion: '0.72.3',
          },
          '@react-navigation/native': {
            singleton: true,
            eager: true,
            requiredVersion: '6.1.6',
          },
          '@react-navigation/native-stack': {
            singleton: true,
            eager: true,
            requiredVersion: '6.9.12',
          },
          'react-native-safe-area-context': {
            singleton: true,
            eager: true,
            requiredVersion: '4.5.0',
          },
          'react-native-screens': {
            singleton: true,
            eager: true,
            requiredVersion: '3.20.0',
          },
        },
      }),
    ],
To consume MiniApp inside HostApp, in HostApp's index.js file let's add MiniApp's script:
ScriptManager.shared.addResolver(async (scriptId, caller) => {
  const resolveURL = Federated.createURLResolver({
    containers: {
      MiniApp: 'http://localhost:9000/[name][ext]',
    },
  });

  const url = resolveURL(scriptId, caller);
  if (url) {
    return {
      url,
      query: {
        platform: Platform.OS,
      },
    };
  }
});
Now we can consume the modules exposed by MiniApp, in this case we can create a screen, using MiniAppNavigator from MiniApp:
import React from 'react';
import {Federated} from '@callstack/repack/client';
import {ActivityIndicator, StyleSheet, View} from 'react-native';

const MiniAppNavigator = React.lazy(() =>
  Federated.importModule('MiniApp', './MiniAppNavigator'),
);

const FallbackComponent = () => (
  <View style={styles.container}>
    <ActivityIndicator color="gba(56, 30, 114, 1)" size="large" />
  </View>
);

const MiniAppScreen = () => (
  <React.Suspense fallback={<FallbackComponent />}>
    <MiniAppNavigator />
  </React.Suspense>
);

const styles = StyleSheet.create({
  container: {
    flex: 1,
    justifyContent: 'center',
    alignItems: 'center',
  },
});

export default MiniAppScreen;
And add this screen to HostApp's MainNavigator:
import React from 'react';
import {StyleSheet, ImageRequireSource} from 'react-native';
import {
  createNativeStackNavigator,
  NativeStackNavigationProp,
} from '@react-navigation/native-stack';

import HomeScreen from '../screens/HomeScreen';
import DetailScreen from '../screens/DetailScreen';
import MiniAppScreen from '../screens/MiniAppScreen';

export type MainStackParamList = {
  Home: undefined;
  Detail: undefined;
  MiniApp: undefined;
};

export type MainStackNavigationProp =
  NativeStackNavigationProp<MainStackParamList>;

const Main = createNativeStackNavigator<MainStackParamList>();

const MainNavigator = () => {
  return (
    <Main.Navigator
      screenOptions={{
        headerTitle: 'HostApp',
        headerBackTitleVisible: false,
        headerStyle: styles.header,
        headerTitleStyle: styles.headerTitle,
        headerTintColor: 'rgba(255,255,255,1)',
      }}>
      <Main.Screen name="Home" component={HomeScreen} />
      <Main.Screen name="Detail" component={DetailScreen} />
      <Main.Screen
        name="MiniApp"
        component={MiniAppScreen}
        options={{headerShown: false}}
      />
    </Main.Navigator>
  );
};

const styles = StyleSheet.create({
  header: {
    backgroundColor: 'rgba(56, 30, 114, 1)',
  },
  headerTitle: {
    color: 'rgba(255,255,255,1)',
  },
});

export default MainNavigator;
Preparing for Production
Now we need to prepare our app for production by signing our bundles with a private key so we can validate authenticity with the public key.
First generate public and private keys:
ssh-keygen -t rsa -b 4096 -m PEM -f jwtRS256.key && openssl rsa -in jwtRS256.key -pubout -outform PEM -out jwtRS256.key.pub
Remember to .gitignore the generated keys:
*.key*
On MiniApp's webpack.config.mjs file, add to plugins array:
      new Repack.plugins.CodeSigningPlugin({
        enabled: mode === 'production',
        privateKeyPath: path.join('..', '..', 'jwtRS256.key'),
        outputPath: path.join('build', 'outputs', platform, 'remotes'),
      }),
This Repack plugin will sign the bundle generated at the indicated path.
You can also add the plugin to convert to Bytecode using the Hermes engine:
new Repack.plugins.ChunksToHermesBytecodePlugin({
        enabled: mode === 'production' && !devServer,
        test: /\.(js)?bundle$/,
        exclude: /index.bundle$/,
      }),
And now to generate the iOS and Android bundles we can add the following scripts:
"bundle": "yarn bundle:android && yarn bundle:ios",
"bundle:android": "react-native webpack-bundle --dev false --platform android --entry-file index.js",
"bundle:ios": "react-native webpack-bundle --dev false --platform ios --entry-file index.js",
"server": "python3 -m http.server -d build/outputs 9000"
As you can see we also added a server script, which will serve the bundle files via an http service on port 9000 to be consumed by HostApp.
Now we need to read MiniApp's production bundle in HostApp, as it is signed, we need the public key to validate it. To do this, we add the public key that was generated to the file, packages/host-app/android/app/src/main/res/values/strings.xml:
<resources>
    <string name="app_name">HostApp</string>
    <string name="RepackPublicKey">
        -----BEGIN PUBLIC KEY-----
        MIICIjANBgkqhkiG9w0BAQEFAAOCAg8AMIICCgKCAgEAwer7+uAwnmQDbXEbOJn0
        zTYbfVgZafppn9WYjbtCJlfhFzEaSkhAFzcW942MjwxhOMG8H+z25k7XgB5ddtmx
        BRuYpwuOR+lCAbbmr1NWWoY8TSFH+Jwj8A2F5R33h8ezz/fFdM8SQ3hnxB3oWsDK
        fVZffI3W14PjJa6h0SqV5n0ltLsDQoAz1IaOWp+Asu99wF5R2/+z13uzC+VY6Ni3
        qG7ubpw1iiNnMwJPy0y2m9yvmFRtC1v25ztp4jWmTA/CKNtZ/03KiL8BNNltWgIo
        l6q8iYfnwleM8e42hXZdojzMJTfW7/U1dHtomIaQFaljQpEKUNuz/4oi9B3L4/pk
        GKWWrBzWHaAxtrblzsiWOmRPI//iyhyTF0qGO58Fig3hhul1cqp2gpCeZyb6aYyk
        H6TH4nN9ltNlMX3OXhE/5TFEoqiAgiBXtyr/+bFOEdxPGP9Oq2y3XHob4GS5XSKJ
        vX4tdAvDVy8PBv1vaWPLJ/av5QspFRV5/3nuH4RXVMg/TkAobSydyEqwylzpXQUw
        Wdc2OH2JbOTmPTgwH9IVaVfcIUi3jF4dP4uKOsvk4qi5wb7a2PzojLPXGKXw7ayi
        /AkcAkmsp+IkWokCBxhsCDAZxqfIqFP7qOK0+Zwj2VexC48+gWKmb9YEUGLGVSdl
        aMBhUYcbKWcUMwXWoymDu/ECAwEAAQ==
        -----END PUBLIC KEY-----
    </string>
</resources>
And to the file packages/host-app/android/app/src/main/res/values/strings.xml:
<key>RepackPublicKey</key>
	<string>
-----BEGIN PUBLIC KEY-----
MIICIjANBgkqhkiG9w0BAQEFAAOCAg8AMIICCgKCAgEAwer7+uAwnmQDbXEbOJn0
zTYbfVgZafppn9WYjbtCJlfhFzEaSkhAFzcW942MjwxhOMG8H+z25k7XgB5ddtmx
BRuYpwuOR+lCAbbmr1NWWoY8TSFH+Jwj8A2F5R33h8ezz/fFdM8SQ3hnxB3oWsDK
fVZffI3W14PjJa6h0SqV5n0ltLsDQoAz1IaOWp+Asu99wF5R2/+z13uzC+VY6Ni3
qG7ubpw1iiNnMwJPy0y2m9yvmFRtC1v25ztp4jWmTA/CKNtZ/03KiL8BNNltWgIo
l6q8iYfnwleM8e42hXZdojzMJTfW7/U1dHtomIaQFaljQpEKUNuz/4oi9B3L4/pk
GKWWrBzWHaAxtrblzsiWOmRPI//iyhyTF0qGO58Fig3hhul1cqp2gpCeZyb6aYyk
H6TH4nN9ltNlMX3OXhE/5TFEoqiAgiBXtyr/+bFOEdxPGP9Oq2y3XHob4GS5XSKJ
vX4tdAvDVy8PBv1vaWPLJ/av5QspFRV5/3nuH4RXVMg/TkAobSydyEqwylzpXQUw
Wdc2OH2JbOTmPTgwH9IVaVfcIUi3jF4dP4uKOsvk4qi5wb7a2PzojLPXGKXw7ayi
/AkcAkmsp+IkWokCBxhsCDAZxqfIqFP7qOK0+Zwj2VexC48+gWKmb9YEUGLGVSdl
aMBhUYcbKWcUMwXWoymDu/ECAwEAAQ==
-----END PUBLIC KEY-----
		</string>
Now we will have a new URL to search for our production bundle, so we have to edit our HostApp's index.js file:
ScriptManager.shared.addResolver(async (scriptId, caller) => {

  let containers;

  if (__DEV__) {
    containers = {
      MiniApp: 'http://localhost:9000/[name][ext]',
    };
  } else {
    containers = {
      MiniApp: `http://localhost:9000/${Platform.OS}/remotes/[name][ext]`,
    };
  }

  const resolveURL = Federated.createURLResolver({containers});

  const url = resolveURL(scriptId, caller);
  if (url) {
    return {
      url,
      query: {
        platform: Platform.OS,
      },
      verifyScriptSignature: __DEV__ ? 'off' : 'strict',
    };
  }
});
We can run our HostApp in release mode with the statically served bundle:
react-native run-ios --mode Release
Here is the final version of the Super App in the final branch. Any questions, suggestions please contact me.
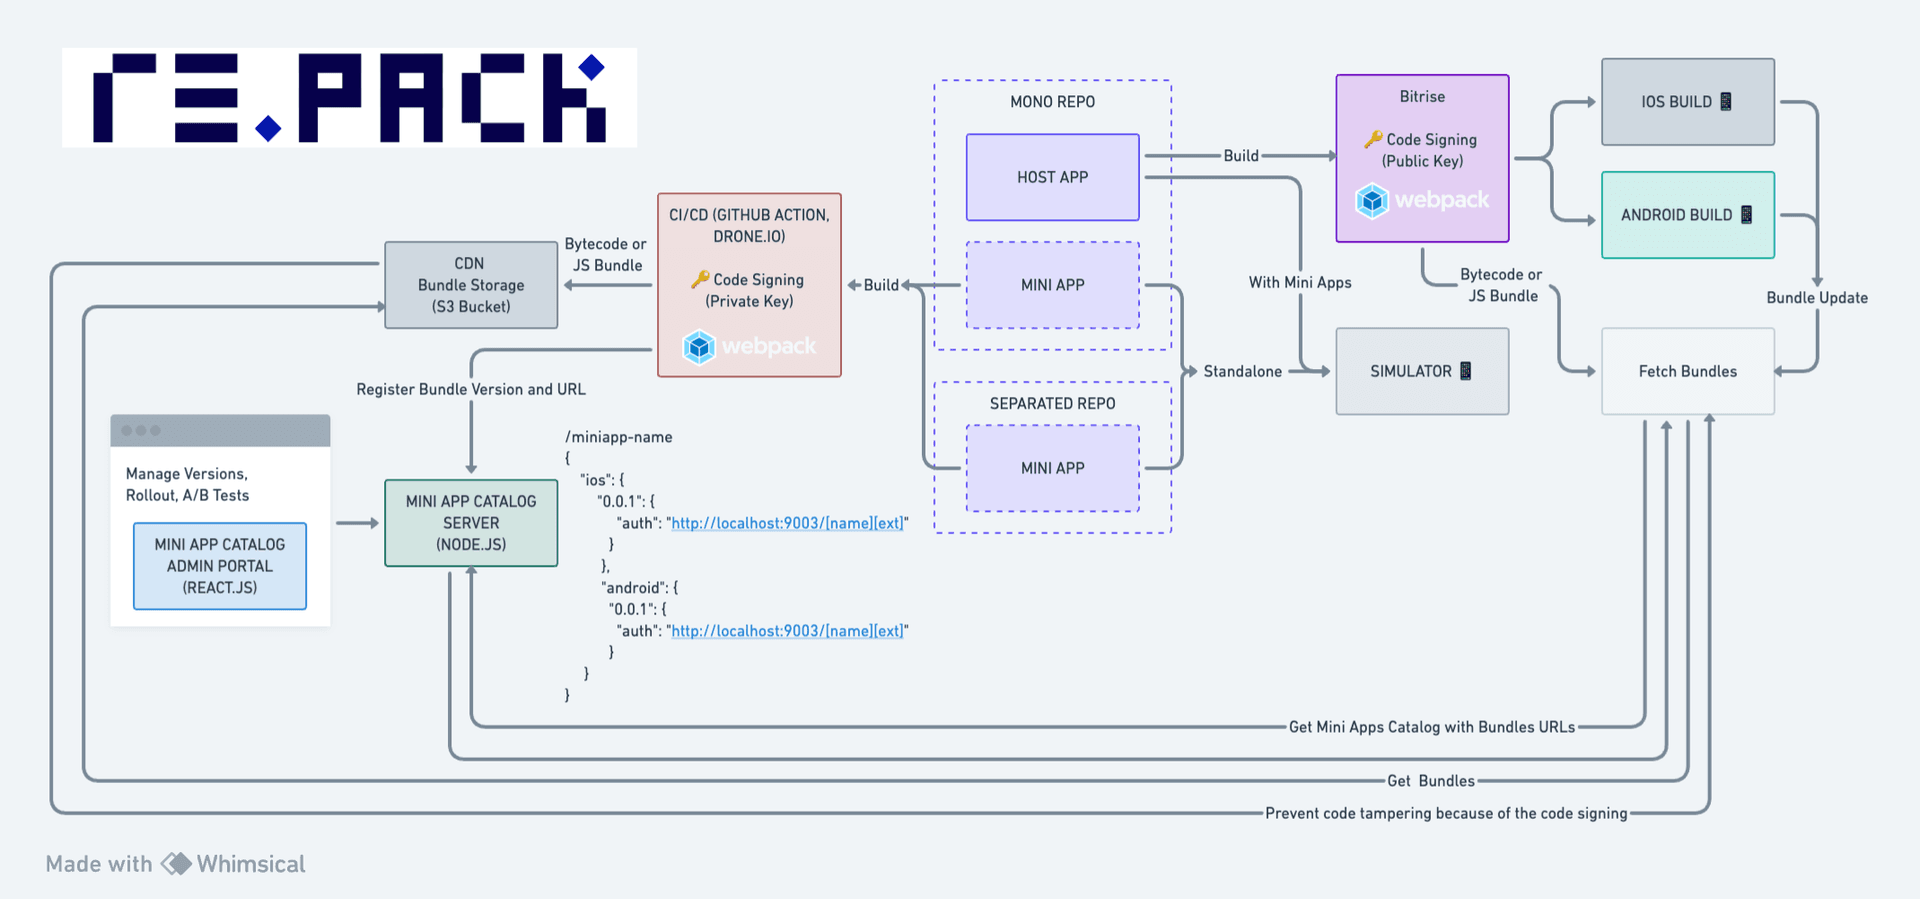
With Re.Pack it is possible to assemble the following architecture:

The repository with a more complete SuperApp, with more miniapps, in separate repositories can be found here.